How to work with Python Virtual Environment
1. Install virtualenv:
Open Git Bash and run the following command:
pip install virtualenv
def func:
	print("helo")
2. Create a virtual environment:
Go to your project directory using Git Bash and then run the following command:
virtualenv <YOUR_ENV_NAME>
virtualenv venv
Replace <YOUR_ENV_NAME> with the desired name for your virtual environment.
3. Activate the virtual environment:
To activate the virtual environment from your project directory, run the following command:
Bash on Windows:
source <YOUR_ENV_NAME>/Scripts/activate
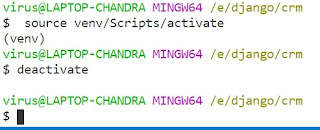
source venv/Scripts/activate
Note: If you encounter an error related to script execution, you may need to adjust the execution policy. Run the following command in Git Bash with administrator privileges:
Set-ExecutionPolicy -ExecutionPolicy RemoteSigned -Scope CurrentUser.\venv\Scripts\activate
source venv/bin/activate4. Install packages within the virtual environment:
While the virtual environment is activated, you can use pip to install packages. For example:
pip install package_name
5. Generate a requirements.txt file:
To create a requirements.txt file that lists all the installed packages and their versions, run the following command while the virtual environment is activated:
pip freeze > requirements.txt
This command will generate a requirements.txt file in your project directory.
6. Install packages from requirements.txt:
If you want to install all the packages listed in the requirements.txt file into another environment or on a different machine, follow these steps:
a. Create a new virtual environment (if necessary) and activate it.
b. Navigate to the project directory where the requirements.txt file is located.
c. Run the following command to install the packages:
pip install -r requirements.txt
7. Deactivate the virtual environment:
To deactivate the virtual environment and return to the system's default Python environment, run the following command:
deactivate
8. Use the virtual environment in VSCode:
To use the virtual environment within VSCode, open the integrated terminal (Ctrl+`) and ensure that the correct virtual environment is activated. You can check this by seeing the environment name at the beginning of the command prompt.
Example:
(YOUR_ENV_NAME) user@PC MINGW64 /c/project_directory $

Additional Information:
- Virtualenv allows you to create isolated Python environments, which helps manage package dependencies for different projects.
- It's recommended to create a new virtual environment for each project to keep dependencies separate.
- You can delete a virtual environment by simply deleting its folder.
- Remember to activate the virtual environment each time you work on your project to ensure you're using the correct Python interpreter and installed packages.


